Life, well it happens. Been quite a while since I posted, but there are pretty good reasons. Two changes in jobs, closing the commission painting business due to lack of clients, etc etc etc. Lets just call it no time and keep it simple.
As it stands I have a LOT of GW Dark Eldar and Space Marine product sitting on shelves that I'm going to be selling to clear space. Plus some specialty stuff I bought and I'm never going to get around to working on from other companies. It's pretty distressing to know my 'hobby time' is going to be practically non-existent for quite a while yet.
Geeze, thinking about it I haven't played a single 40k game in nearly 2 1/2 years, and about 2 for Infinity. I really need to get some table time with Infinity. Compared to 40k, Infinity is by far more fun to play, and doesn't make me cringe when I see the pricing on figures/boxes.
Well, off to deal with more life, and debate some posts I want to make about the idiocy in Ferguson, Mo.
Until later, be well.

Wednesday, November 26, 2014
Tuesday, September 4, 2012
Initial Terrain WIP, Part 7
Had to take some time off from the work on the Sinner's Respite due to my printer running out of ink. But I finally got moving on it again after a trip to Fedex Kinko's.


I printed out a number of textures on cardstock to use in detailing out the structure. Overall the effect is pretty nice, and a bit of touch-up with paint and marker will be necessary. But I am happy with the direction this building is going in. I'll be working on the second level later tonight, with a total revision of how to do the doors (which means a small amount of break down and rebuild).
Until later!
Sunday, August 26, 2012
Initial WIP on Terrain, Part 6 (Terrain in a Game)
Today is an update just showing the current terrain project in a game of Infinity. Detailing updates will continue Monday evening as today is a 'day of rest' for me.


Initial table layout. The hot wheels cars are a tad on the small size, but did give a bit of cover in play. The walls on top of several of the buildings are from War Gamma ( WarGamma.com ), The crates and pipes are hirst mold stuff cast in resin. The white foamboard buildings are from a league member, while all the grey buildings and oriental style buildings are things I've built or am in the middle of detailing.

Overall the Sinner's Respite has been working out well. Both games had someone use it. In my first game both of my Dasyu (1 sniper, 1 hacker) used it to great effect (okay not so much the hacker... missed all her hacking rolls by 1). In the second game one of my Naga placed 3 mono mines in it and tied up one of the opponents figs for the entire game (though the GML neutered my list in turn 2).
C&C welcome!
Until later!


Initial table layout. The hot wheels cars are a tad on the small size, but did give a bit of cover in play. The walls on top of several of the buildings are from War Gamma ( WarGamma.com ), The crates and pipes are hirst mold stuff cast in resin. The white foamboard buildings are from a league member, while all the grey buildings and oriental style buildings are things I've built or am in the middle of detailing.
 |
| JSA vs. a Nomad GML list |
 |
| my ALEPH vs a Haqq list |

 |
| My Marut going Rambo, at this point my opponent conceded the game because of a lack of a reliable way to deal with ARM 8 and BTS -9. |
C&C welcome!
Until later!
Friday, August 24, 2012
Initial WIP on Terrain, Part 5
Day 5 comes to a close. Didn't get as much finished as I'd like, partially due to having to go material shopping.... Seriously, who the heck prices paper? 250 sheets of cardstock for $14.99+ tax? No packages smaller at the office supply stores? Had to settle for 67 lb cardstock at one of the craft stores, when I REALLY wanted 110 lb. Oh, and my new scroll saw blades... well they are pretty slick... they are called Spiral blades, and can cut in 360 degrees without turning the material being cut... unfortunately they have a HUGE downside. This downside being that they are VERY easy to break. Inside of the first 20 minutes working I'd broken 2 of them, and one was simply from trying to put it in the blade holders a little to tight. *sigh*
What I did accomplish was adding some external electrical breaker boxes to the building, 2 interior sliding doors, framing out the second story balcony, adding in posts to the third floor to add some kind of LoS obsuring lattice (probably), adding clay tile plasticard to the upper roof, as well as buildng an air handler to put on the roof. Overall about 1/2 of what I wanted to get done today. But not really to far behind at this point.
Imagery galore:


You've likely noticed the 'fringe' on some of the doors and other edges. This will be dealt with, it's a mix of primer/humidity and minor fringing of the hardboard I used. I'll be sanding the areas that are having the issue and when I get to painting it will go away.
C&C is most welcome!
Until Later!
Thursday, August 23, 2012
Initial WIP on Terrain, Part 4
Day 4 of the construction of Sinner's Respite. Things went really great for the first 3 hours of work, then my last scroll saw blade broke. So the last cutting I needed to do in order to finish the roof on the third floor had to be postponed until tomorrow.
Since pretty much everything else had been finished to the pre-detailing point I decided to prime the building. I left the main club wood floor masked while I primed it so that I could use wood stain on the floor in that room. As soon as I get the new scroll saw blade installed I'll finish the last cuts to finish the roof and then I'll get onto beginning to do detail work.
Progress to this point:

C & C welcome!
Until later!
Since pretty much everything else had been finished to the pre-detailing point I decided to prime the building. I left the main club wood floor masked while I primed it so that I could use wood stain on the floor in that room. As soon as I get the new scroll saw blade installed I'll finish the last cuts to finish the roof and then I'll get onto beginning to do detail work.
Progress to this point:
 |
| 1/2" tall 'railing' around the upper floor will give no cover unless someone is shooting at a fig from ground level. This kind of balances out other factors in the building. Though part of the 'roof' will have a decorative fence added that will give full cover from certain angles. I also plan to build an air handler (hvac compressor) to place on the roof as well. |

 |
| This room will have a modular wall most likely to allow it to be used in multiple ways. |
 |
| I have to trim one side of the roof, and cut the interior rafters for strengthening this piece. Without the rafters it will be VERY easy to break the glue joints. |
 |
| Front |
 |
| Right |
 |
| Back |
 |
| Left |
 |
| This corner seperated before the glue fully set, yet is still glued together. I'll be covering this corner with plasticard which should also increase the joints strength. |
 |
| Initial priming |
Until later!
Wednesday, August 22, 2012
Initial WIP on Terrain, Part 3
Day 2 of actual cutting and construction. Things went a bit smoother today, though the scroll saw had a blade snap which I had to replace. But overall my preplanning on wall placement and door cuts sped things up quite a bit.
At this point I have the ground floor and second floor finished (sans detailing), and tomorrow I'll begin work on the last level and roofing. Once that is completed I'll begin detailing with bass wood and plasticard before priming and painting. Once that step is complete I'll be going in with cardstock which will have carpet textures, wall paper/paneling, and posters.
Todays progress:

This image shows how I lined out the board with a mechanical pencil, this really helped speed things up as I could measure parts of the work on the fly.


In these images You can see the work as I realized in some cases it would be necessarily to use smaller lengths of hardboard to make a full wall. Of course clamping is a necessity to make sure that the glue joins between walls and the 'floor' were solid, this also helped in another way, in that the walls took out the warping in the larger floor section.


More clamping in evidence, but the overall feel of the second floor is very obvious at this point. The stairs to the third floor/roof can be seen as I was constructing them at the time I took this pic. Lesson learned from this staircase: Individual risers are a total pain in the butt to do, if the measurements are off by even 1/16" they tend to fall, clamping is an absolute must in cases like this.

This floor has a japanese style bath (upper right corner), 2 private rooms (middle top/bottom), and a 'dungeon' type room connected to the private rooms as well as the hallway near the stairs. There is a 'utility room' in the upper left corner behind the stairs, but it is built to be inaccessible and will only have a door for show.
The stairs from ground level end in an entrance portico, though it is only semi-useful for infantry figs as the longest length of it only has 1/2" before the rail/wall. Honestly I don't mind that little oversight, as it reduces the camping possibilities inherent in balconies. And it still gives a level of cover to the figs on the uppermost stair(s).
Part 4 tomorrow night! Feel free to comment.
Until later!
At this point I have the ground floor and second floor finished (sans detailing), and tomorrow I'll begin work on the last level and roofing. Once that is completed I'll begin detailing with bass wood and plasticard before priming and painting. Once that step is complete I'll be going in with cardstock which will have carpet textures, wall paper/paneling, and posters.
Todays progress:

This image shows how I lined out the board with a mechanical pencil, this really helped speed things up as I could measure parts of the work on the fly.


In these images You can see the work as I realized in some cases it would be necessarily to use smaller lengths of hardboard to make a full wall. Of course clamping is a necessity to make sure that the glue joins between walls and the 'floor' were solid, this also helped in another way, in that the walls took out the warping in the larger floor section.


More clamping in evidence, but the overall feel of the second floor is very obvious at this point. The stairs to the third floor/roof can be seen as I was constructing them at the time I took this pic. Lesson learned from this staircase: Individual risers are a total pain in the butt to do, if the measurements are off by even 1/16" they tend to fall, clamping is an absolute must in cases like this.
 |
| Perspective view |

This floor has a japanese style bath (upper right corner), 2 private rooms (middle top/bottom), and a 'dungeon' type room connected to the private rooms as well as the hallway near the stairs. There is a 'utility room' in the upper left corner behind the stairs, but it is built to be inaccessible and will only have a door for show.
The stairs from ground level end in an entrance portico, though it is only semi-useful for infantry figs as the longest length of it only has 1/2" before the rail/wall. Honestly I don't mind that little oversight, as it reduces the camping possibilities inherent in balconies. And it still gives a level of cover to the figs on the uppermost stair(s).
Part 4 tomorrow night! Feel free to comment.
Until later!
Initial WIP on Terrain, Part 2
Yesterday I posted up a discussion on some of the materials I'm using in terrain building for my current project(s). Today I'll begin discussing various topics about buildings for wargaming. My current project I'm calling 'Sinner's Respite' a mildly Japanese influenced 'gentlemans club' building for use in my local Infinity league. This project isn't limited to the one building, as I will also be working on at least 2 small shop/homes (store on bottom, apartment/home above), a relatively large warehouse (12-18" by 18-24" still deciding), and possibly a Japanese influenced Inn.


I will be interspersing images from my second day of 'work' and first actual day of assembly/design.
I've decided to use hardboard as the primary material for this project, though what I will discuss can be adapted for foamboard, foamed pvc sheeting, plasticard and other materials with a little thought.
The first thing to consider when building buildings for use with miniature gaming is that each miniature is on a base. These bases range in size, but a fairly typical 'infantry' base is 25-30mm. So keeping that in mind, any doorway for use by infantry needs to be able to accept the a miniature standing in it. I decided that it was a good idea to go roughly 31mm (1 1/2") for 'typical' doorways, and 50mm (2") for double doors or larger access ways.

This image shows the main entrance to the club, it is 50mm (2") wide. It also has 2 1"x1" windows, which I'm still deciding if they will be windows or marquee display boxes. This brings up another issue with buildings for wargaming, windows. If you build windows to scale, they can tend to be far to large, giving massive firing access into a building; while also severely reducing cover for models inside of the building. This being the case I've settled on 1" widths and 3/4" height on 'typical' windows. Larger windows I will use for storefronts and such where I plan to build interior LoF blocking terrain (shelves, cabinets, etc.).

Another major issue when working on the design of any building for wargaming is hallways, rooms, and accessibility. One key thing that comes into this is wall height. I use 2 1/2" as a standard for wall height for each level of a building. This allows me to cut a large number of walls with a table saw to the same height, which reduced the amount of work in the long run. 2 1/2" allows larger miniatures to be used in the building without many problems (Many of the Infinity TAGs are less than 2 1/2" tall).
With wall height determined (and in my case standardized), hallways are the next issue to deal with. In a 25-28mm scale 1" is 'roughly' 1 meter (somewhat more than 3 feet). A 1" hallway will in the vast majority of cases be entirely to small for based figures to move in, as the base will get stuck (and 30mm bases won't even fit). That being the case I would suggest that hallways intended for 'typical infantry' be 1 1/2" wide (38mm), and hallways for use by larger figs or multiple figs (without blocking LoF for the next fig) being 2" wide (50mm). Keep in mind, if you are playing a game system like... oh... Warhammer 40k... You'll need even larger hallways and likely 3" walls, seeing as they are 'heroic scale' which really means 'big guys for no real reason than coolness'.

Another issue at this point is a means to move from level to level. In my current case I'm using stairways as my vertical access way. With stairways you have 3 main issues. 1) What size miniatures (bases) do you want to use the stairs without issue. 2) How 'deep' to make each stair (By depth I mean if looking straight at it front to back measure). 3) How high must it go to reach the next level.
Issue 1 is the easiest to deal with, if you want 25-30mm bases to fit easily, then make them 5 or so millimeters wider. For 40mm bases I tend to go 2" (50mm), as figs on 40mm bases also tend to overhang them a bit with arms/weapons. For this club I decided early on to use 2" (50mm) wide hallways and staircases.
Issue 2 depends on how much room on the building you want the stairs to take. I am using 1" deep (25mm) stairs built so that each stair has a gap between it and the next to allow larger bases to slide into the gap. This trick is helpful as it allows larger bases to fit on the stairs comfortably and with little fear of falling off (which can break some figs glue joins).
Issue 3 goes hand in hand with issue two, as the rise of a staircase can totally change its look (rise is a term used to talk about angle and spacing of stairs). In my case I went with 3/8" upward rise for each stairs top. So that the top of a stair will be 3/8" higher than the next. And I decided not to overlap the stairs, so in my case the stairs are much longer than they might have been (6" long actually). I could have made this staircase take up only 4" of length, but felt that the longer stairs fit the buildings aesthetics a bit better.

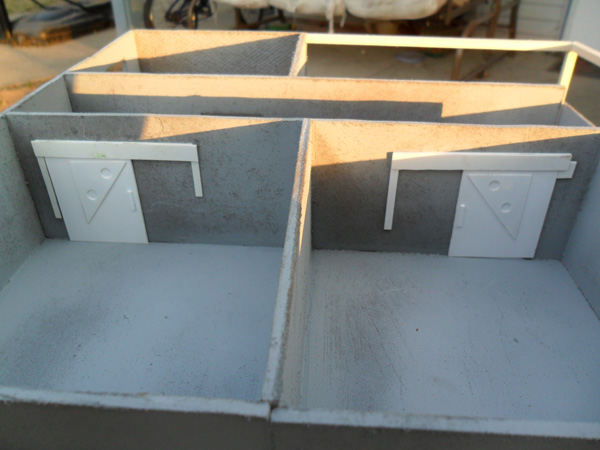
Note that this picture is actually of the underside of the second floor. I have measured in to the farthest interior corners of the ground floor and on the underside of the next floor put in stop blocks. These are just small off-cuts that are glued in place, this allows the roof to be put in place and when playing the second floor won't shift much if any when/if the table is bumped. It also makes it easy to get the second floor aligned correctly with the ground floor.

This is the interior of the ground floor of the club (undetailed). I made sure when designing the interior of the club ground floor to include several ways to move about in the club. The 'dance floor/main hall' is made up of craft sticks, which I glued to paper (3 full rows of them), let them dry overnight then cut with my scroll saw into roughly 1"x1" squares. I then glued them in place with wood glue so that each square was either N<>S or E<>W in orientation, giving it a somewhat checkerboard appearance.
The club 'rest rooms' are the rectangular area on the right. They are not going to be accessible for play, but will have doors marked with the generic man or woman images on them (I'm going a bit excessive on my level of detail with this build). As you can see in the picture each area of the club seems to have windows. You may think it is odd (my wife sure did). But here is the explanation: I'm not going to use them all, but any building for a wargame needs places to shoot out of buildings. So I evenly spaced windows on each side, but at least 2 from each side will be 'covered' when I detail the exterior and interior.
Looking at the picture above this is the layout. Left to Right: Entrance/Lobby, (middle top) Dressing Area for Dancers, (middle bottom) Stage & Club Floor, Access Hallway to 'Patrons' exit (access to upper stories and 'private' rooms).
The entrance/lobby area is roughly 3" by 10" and will have some couches and a small bar. The dressing area will have several armoires and makeup tables. The stage & club floor will get some Japanese style tables w/cushions, the entrance from the dressing room is getting a cloth entry cover, and the stage will be getting a 'dancing pole' made from brass rod. The patrons access hallway will be getting some plants and minor things to make it look like the patrons are 'high class' or at least think they are.
When I get to detailing the interior I will be printing out wall coverings to glue in place on cardstock, floor coverings as well. Some greenstuff, plasticard, and other materials will go into the various furniture. And I will be wood staining the checkerboard flooring as well. On the exterior I will be going with a mix of wood and high tech materials, and painting them... well I'm working on that.
Part 3 will be up tomorrow night, feel free to comment!
Until Later!
Monday, August 20, 2012
Initial WIP on Terrain, Part 1
I've gotten some more materials, and chopped it up into manageable pieces. At this point I'm working out the layout of the upcoming buildings on graph paper. This post (and at least one more) will be a bit of discussion on materials and planning for terrain building.
I hit Lowe's for a 4'x8' sheet of 1/8" Tempered Hardboard ($8.48 locally), all tempered means is that unlike non-Tempered hardboard both sides are smooth. 'Regular' hardboard is smooth on one side, and has a very rough almost dimpled texture on the other side. Now, having picked out the board I then preceded to make a big mistake... I had a Lowe's employee cut the board on their panel saw... never... never... NEVER again will I do that. Absolutely NOTHING came out the right measurement after cutting... lesson learned: buy the material, go to my father's garage, use his table saw.
Now, using hardboard has some really good upsides, but it does have some downsides as well. Hardboard is reasonably light and for its thickness and has good rigidity. It accepts sanding, painting, and gluing well. It can be formed into curves (this leads into and is also part of the biggest downside). On the other hand, moisture can play havok with hardboard. Humidity can warp it out of a flat shape into a curve. Spill water/soda/tea/etc on it and the spot can come apart in a fibrous mass if it isn't cleaned up VERY quickly.
Hardboard is also useful for the fact that it can be cut with saws or even utility knives, and it is quite reasonably priced at hardware stores.
Next on my list of materials on hand, foamboard (3/16"). Your typical Wal-Mart or arts and crafts store carries this stuff at various prices. It's usually pretty cheap. It has some upsides, but the downsides can be a show stopper if you haven't had the chance to use it enough to learn how to deal with them.
On the upside, it's VERY light, which makes storage more of a bulk issue than a bulk and weight issue. It's very easy to cut doors and windows into with just a hobby knife. You can glue it together with Elmer's white glue (PVA glue), and since that is pretty cheap too that's a great thing. Unfortunately the biggest problem with foamboard is the card on each side of the foam. Water soaking one side of the foamboard will cause warping as it dries, and even worse is if you use PVA on the flat surfaces as it contracts as it dries. Painting can have similar problems as well.
Ways to deal with this are to wet both sides of the board and clamp it down as it dries to make sure it 'cures' flat. Another way is to use a spray primer from about 16-18" away and put a thin coating of primer on both sides. Lastly is my way of doing it... flat spray varnish. I spray any buildings I make from roughly 12" away with spray varnish, let it dry for about 30 minutes, then hit it with spray primer. Now, before I do that there is one extremely important step... sealing the foam... I use white glue at 50/50 with water to thin it and brush it along the exposed foam. Let it dry for a few hours, then my varnish trick.
Up on deck now... plasticard. The be-all-end-all of some terrain builders. It's usefulness rests entirely on your ability to cut, sand, bend, heat, score, yadda yadda yadda. Basically it's only as useful as you can make it be. It comes in a large variety of thicknesses, which allows it to be used for a vast number of applications in terrain making from walls to doors to windows (with clear types). It is also possible to get plastic tubing, rods, I-beams, and other shapes from various manufacturers (Plastruct, Evergreen).
The real downsides of plasticard come in the form of price and your skill using hobby tools to get what you want cut from it. Plasticard can be found 'cheap' through most hardware stores plastic yard sale type signs, but if you want it with patterns (diamond plate, corrugated, etc) or in specific sized sheets then the price can take a rather drastic increase. It is possible to find hobby suppliers that sell it at 'lower than retail' though, but it can take some work to find one. Other than the cost a persons skill with a hobby knife/scalpel/hobby saw becomes a big factor with plasticard, additionally patience is a necessity, as many light cuts tend to work much better than a couple of heavy cuts.
Just a few examples of some of the materials I'll be using for my next terrain project (not all, but most is shown). And yes, my kitchen table has become a massive 'dumping ground' of terrain building material... just glad it has been so nice outside lately so I can get things moved outside to work on.


Well that's all for now, I'll have part 2 up tomorrow evening. Feel free to comment!
Until later!
I hit Lowe's for a 4'x8' sheet of 1/8" Tempered Hardboard ($8.48 locally), all tempered means is that unlike non-Tempered hardboard both sides are smooth. 'Regular' hardboard is smooth on one side, and has a very rough almost dimpled texture on the other side. Now, having picked out the board I then preceded to make a big mistake... I had a Lowe's employee cut the board on their panel saw... never... never... NEVER again will I do that. Absolutely NOTHING came out the right measurement after cutting... lesson learned: buy the material, go to my father's garage, use his table saw.
Now, using hardboard has some really good upsides, but it does have some downsides as well. Hardboard is reasonably light and for its thickness and has good rigidity. It accepts sanding, painting, and gluing well. It can be formed into curves (this leads into and is also part of the biggest downside). On the other hand, moisture can play havok with hardboard. Humidity can warp it out of a flat shape into a curve. Spill water/soda/tea/etc on it and the spot can come apart in a fibrous mass if it isn't cleaned up VERY quickly.
Hardboard is also useful for the fact that it can be cut with saws or even utility knives, and it is quite reasonably priced at hardware stores.
Next on my list of materials on hand, foamboard (3/16"). Your typical Wal-Mart or arts and crafts store carries this stuff at various prices. It's usually pretty cheap. It has some upsides, but the downsides can be a show stopper if you haven't had the chance to use it enough to learn how to deal with them.
On the upside, it's VERY light, which makes storage more of a bulk issue than a bulk and weight issue. It's very easy to cut doors and windows into with just a hobby knife. You can glue it together with Elmer's white glue (PVA glue), and since that is pretty cheap too that's a great thing. Unfortunately the biggest problem with foamboard is the card on each side of the foam. Water soaking one side of the foamboard will cause warping as it dries, and even worse is if you use PVA on the flat surfaces as it contracts as it dries. Painting can have similar problems as well.
Ways to deal with this are to wet both sides of the board and clamp it down as it dries to make sure it 'cures' flat. Another way is to use a spray primer from about 16-18" away and put a thin coating of primer on both sides. Lastly is my way of doing it... flat spray varnish. I spray any buildings I make from roughly 12" away with spray varnish, let it dry for about 30 minutes, then hit it with spray primer. Now, before I do that there is one extremely important step... sealing the foam... I use white glue at 50/50 with water to thin it and brush it along the exposed foam. Let it dry for a few hours, then my varnish trick.
Up on deck now... plasticard. The be-all-end-all of some terrain builders. It's usefulness rests entirely on your ability to cut, sand, bend, heat, score, yadda yadda yadda. Basically it's only as useful as you can make it be. It comes in a large variety of thicknesses, which allows it to be used for a vast number of applications in terrain making from walls to doors to windows (with clear types). It is also possible to get plastic tubing, rods, I-beams, and other shapes from various manufacturers (Plastruct, Evergreen).
The real downsides of plasticard come in the form of price and your skill using hobby tools to get what you want cut from it. Plasticard can be found 'cheap' through most hardware stores plastic yard sale type signs, but if you want it with patterns (diamond plate, corrugated, etc) or in specific sized sheets then the price can take a rather drastic increase. It is possible to find hobby suppliers that sell it at 'lower than retail' though, but it can take some work to find one. Other than the cost a persons skill with a hobby knife/scalpel/hobby saw becomes a big factor with plasticard, additionally patience is a necessity, as many light cuts tend to work much better than a couple of heavy cuts.
Just a few examples of some of the materials I'll be using for my next terrain project (not all, but most is shown). And yes, my kitchen table has become a massive 'dumping ground' of terrain building material... just glad it has been so nice outside lately so I can get things moved outside to work on.


 |
| A scroll saw makes things SO much easier... luckily I have nearly permanent access to this one. |


Well that's all for now, I'll have part 2 up tomorrow evening. Feel free to comment!
Until later!
Subscribe to:
Posts (Atom)