Whichever holidays you celebrate this time of year, happy holidays to you and yours. Be well, drive safely, and I hope you get the presents you asked for.
Now on to other things. I recieved a unit of Stormblade Infantry and bought a unit of Arcane Tempest Gun Mages for my Cygnar Warmachine force. Brings me up to a 25pt. battleforce to learn the game with, and leaves me plenty of room to grow into a 50 pt steamroller list. Only downside of getting such an awesome deal on the Stormblades ($17 including shipping O.o) is that they are lightly primed in black... I hate black primer, as I tend to prime in grey as it allows me to do darks and lights without a lot of issues.
I'm working on scratch building razorback turrets as well as getting the sketches for scratch built predator turrets and sponsons. The idea is to give the predators a totally unique look, so it is a semi-secret project, just know that turtles will not be harmed in the creation of these unique turrets.
I've also worked out the next batch of repurposed marines to work on next week, going to get the paint redone on 20 Grey Hunters and 12 Long Fangs. As well as some repaint on my Godhammer-pattern Land Raider. Overall not a huge amount to do in a week, but I will also be working on my warmahordes figs to get them finished.
So with that I say fair thee well until anon!

Friday, December 24, 2010
Wednesday, December 22, 2010
Star Drakes Drakon Tu'shak
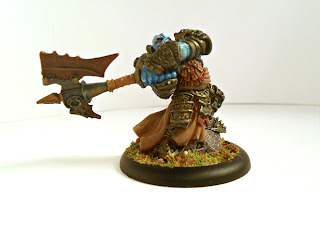
Been a somewhat busy week, though productive, as I've gotten some GS work done on a Rhino... and finished Drakon Tu'shak for my Star Drakes (counts as Space Wolves) Chapter.
The Star Drakes are a hybrid of Nordic and Mezoamerican cultures from their recruiting world on a mixed jungle/badlands deathworld known as Crall VI. A planet which for several millenia was one of a cluster of worlds held in the grip of a massive warp storm, which cut it off from the Imperium since the 34th millenium. The Star Drakes having been cut off during that time as well, within the cluster of several dozen systems, and giving rise to massive deviations in their core doctrines from the Codex Astartes. Though there have been hundreds of warp incursions within the storm wracked area, the Star Drakes have stayed nearly untouched by the effects of chaos... except for the advent of their geneseed deviation which is similar in effect (but not looks) to the Wulfen issue the Space Wolves have with their geneseed.
Tu'shak is a veteran of nearly 600 years of combat within their cluster of warp caged worlds, having risen to the rank of Drakon (Chapter Warchief / Master) nearly 300 years past. He is a follower of the Hasha'tuk Cult within the chapter, which is the follows the tenants of headhunting of enemies. It is just one of three cults within the chapter, each of which gives rise to variations on tactical and strategic doctrines on the battlefield.
The chapter as a whole, as well as many on their recruiting world, revere the Emperor as the greatest man to yet live, but not as a God. The chapter Steel Masters also look upon the dogmatic religion of the Mechanicus with a sense of humor, and when not dealing with them ignore its religious trappings and aim to improve and expand their knowledge without the strictures of the Mechanicus hampering their efforts. This willingness to experiment has led to a number of disasters of one sort or another, but also gave rise to a number of variant vehicles which when the warps storms disipated were found to already be in use by a number of Astartes chapters.
Psykers are relatively common on Crall VI, and nearly every citizen has a latent talent with it, which gives rise to a very large number of psykers within the the Chapter. The Librarium having nearly 10% of the chapter strength, though the chapter is nowhere near the Codex one thousand, having nearly five hundred total. Every Star Drake is trained to use his latent abilities to allow for communications and enhance their senses, while barring their minds to all but the Dragon Readers (Librarians) of the chapter and their closest lodge brothers.
--Drakon Tu'shak--
Time taken to finish: 9 hours (not counting drying times)
Hopefully I'll have a few more figs/models ready before Christmas to post up about.
Comments and critiques are always welcome! Until later!
The Star Drakes are a hybrid of Nordic and Mezoamerican cultures from their recruiting world on a mixed jungle/badlands deathworld known as Crall VI. A planet which for several millenia was one of a cluster of worlds held in the grip of a massive warp storm, which cut it off from the Imperium since the 34th millenium. The Star Drakes having been cut off during that time as well, within the cluster of several dozen systems, and giving rise to massive deviations in their core doctrines from the Codex Astartes. Though there have been hundreds of warp incursions within the storm wracked area, the Star Drakes have stayed nearly untouched by the effects of chaos... except for the advent of their geneseed deviation which is similar in effect (but not looks) to the Wulfen issue the Space Wolves have with their geneseed.
Tu'shak is a veteran of nearly 600 years of combat within their cluster of warp caged worlds, having risen to the rank of Drakon (Chapter Warchief / Master) nearly 300 years past. He is a follower of the Hasha'tuk Cult within the chapter, which is the follows the tenants of headhunting of enemies. It is just one of three cults within the chapter, each of which gives rise to variations on tactical and strategic doctrines on the battlefield.
The chapter as a whole, as well as many on their recruiting world, revere the Emperor as the greatest man to yet live, but not as a God. The chapter Steel Masters also look upon the dogmatic religion of the Mechanicus with a sense of humor, and when not dealing with them ignore its religious trappings and aim to improve and expand their knowledge without the strictures of the Mechanicus hampering their efforts. This willingness to experiment has led to a number of disasters of one sort or another, but also gave rise to a number of variant vehicles which when the warps storms disipated were found to already be in use by a number of Astartes chapters.
Psykers are relatively common on Crall VI, and nearly every citizen has a latent talent with it, which gives rise to a very large number of psykers within the the Chapter. The Librarium having nearly 10% of the chapter strength, though the chapter is nowhere near the Codex one thousand, having nearly five hundred total. Every Star Drake is trained to use his latent abilities to allow for communications and enhance their senses, while barring their minds to all but the Dragon Readers (Librarians) of the chapter and their closest lodge brothers.
--Drakon Tu'shak--
Time taken to finish: 9 hours (not counting drying times)
 | ||
| Contrast is a bit bleh, so the next pic will be fiddled with to allow for more showing of detail. |
 |
| Right leg has a sword holding death angel worked into it, while the left has Tu'shak's personal heraldry of a bronze face mask with ruby eyes and blooded headdress. |
 |
| Headhunter shoulder pauldrons, as well as drake symbols on the Swift Death saurus hide covered Storm Shield. |
 |
| Thunder Hammer with runic inscriptions and rune stones, as well as trophies hung from the power cabling. |
Comments and critiques are always welcome! Until later!
Sunday, December 19, 2010
Tron: Legacy Review
Okay, I admit this has nearly nothing to do with the RPG/Miniature gaming hobby. So what? This has been a movie that has been on the must see list of many for months (if not years). Most gamers have seen and enjoyed the original Tron movie, its a classic after all. And I've been a Tron fan for decades now. So when the opportunity to take my family to see it in Real 3D, it was a given that I'd have to see it.
Now, firstly, I won't complain about the overpricing of theatre tickets and concessions, those are a given anymore and the reason many don't go to a theatre. Nor will I complain about the 'badside' of going to the theatre, chatting people, noisy babies, etc. Since for the first time those things didn't really happen (shock!).
I won't give away anything, as I find it is annoying to have done to me. So I will just cover aspects of the movie as a whole, and give a review based on my overall impression.
The acting was very good, with the choice of actors and actresses being quite good. The anonymous nature of many of the roles filled with colorful looking people helped keep the world of the Grid from looking homogeneous. Bruce Boxletter and Jeff Bridges carried over their roles from the first Tron exceptionally well.
The plotline is easy enough to find on the web, but I will say that it is pretty good, and gives the movie a good energy and fast pace when needed. It is a classic good vs evil plotline, but has a few fun twists and interesting tweaks on the normal g v e type movies. The evolution of the Grid is fun to see as well, with curves becoming a normal thing over pure angles.
The CGI and 3D work were incredible, with effects that quite literally had me going 'Oh Wow!' and 'Damn!' throughout the movie. The evolution of the Grid giving all new looks to the classic ideas, and introducing whole new ideas that take the story to a new level. Surprisingly enough, many of the coming feature trailers had me saying the same things, but that is beside the point.
If I had anything to complain about it would have nothing to do with the film itself, but the theatre having not enough seating further back. Sitting close in on a 3D movie is an eye straining event. 3D technology has definitely grown since the days of the red lense/blue lense glasses, and I'm happy with how it has developed.
I give Tron: Legacy 5 stars. It is action packed, has humorous moments, and gives nods to the classic era of the first movie. All while keeping the audience wondering what is coming next. Well worth seeing in the theatre, and I will definitely be buying a copy when it comes out on Blueray.
Ultramarines movie review
I recently had the chance to see the new Ultramarines movie. And without including spoilers I will be giving my impressions of the movie.
Overall the quality of the 3d animation was excellent, and attention to detail was obvious. Of course I would have prefered they not use the Ultrasmurfs as the main characters, but GW and their 'smurfs are the best' mentality guaranteed that wouldn't happen. The combat scenes were very well done, without looking herky jerky or overly staged.
The plotline was pretty thin, but we are talking about a space marine movie. Marines aren't deep thinkers, they fight, so having a thin plotline isn't such a bad thing. There are places were the dialog seems contrived, and trite, but they don't really detract from the movie overall.
Some of the scenes and plot hooks are a bit overused and typical, but as I've said marines, not deep thinkers, they fight. A few of the 'shock' points in the story aren't really very shocking at all, but again we go with 'marines, etc etc etc.'.
I wouldn't rate this as a 5 star movie, but it is definitely worth a 3 star rating. Worth watching, and I look forward to seeing what else Codex can come up with for further movies.
Sunday, December 12, 2010
What comes from a day stuck in the house
Well the weather is pretty crappy here today. Very cold, snowy, and VERY windy. So I didn't get out of the house, but I did get a few figs nearly completed today. Just a few minor touch ups to do and they will be ready.
First up is Colette Du Bois, of the Arcanist faction in the game Malifaux.

The pic doesn't do her face justice, I can't seem to keep from getting really grainy pics lately. But in person the face isn't at all a 'huh, bleh'. The hardest part was blending up from bronzed flesh, which was far too orange for my tastes.
The other one I worked on today was Lelu, of the Neverborn faction in the game Malifaux.

Very simple color scheme, the horns look bad in the pic but are actually very well blended from a bone>white. I really need to get a much better handle on this camera.
Overall not a bad day for painting, even with the kids wanting to be at my elbow allllllll day.
Looking for a WD article.
I missed WD 365 and 366, so I totally missed the spearhead expansion rules. Anyone that has them and would be willing to scan me a copy I'd be ever so greatful. It's annoying that with 3 LGS not a single one has the issue with those rules left... the ones before and after those issues yes, but not the specific issue. Then GW being tools and only putting the formation part on their website... gotta buy the mag for the rule. (grumble).
It's things like this that frustrate the customer base. And it goes hand in hand with GW's greed tactics of the last large number of years.
Oh well, anyone that happens to have the rules please let me know.
It's things like this that frustrate the customer base. And it goes hand in hand with GW's greed tactics of the last large number of years.
Oh well, anyone that happens to have the rules please let me know.
Friday, December 10, 2010
Flock, and ways to make it better, part 2
The first post in this series had a serious problem... I forgot example photos. So this post will have example photos and cover some of the shortfalls of single/dual material flocking. The photos from part 1 showed a selection of flocking materials that are typically used in basing miniatures. Each has its good points, but today we talk about the downsides of each example.
First lets talk about 'flocking material', the green powdery type, as well as basic sand.
The above photo shows a truly ancient GW fig, an Empire Ogre, painted roughly 20 years ago. The base is a bit worn, and obviously cracked, but will help to show issues with the use of 'flock' as well as sand.
Firstly we'll notice the odd look of each material. They stand out and looked deliberately set. They have a single color (which can be changed through the use of paint, inks, or different color material). Care was taken to attempt to make this base look less like a flat ground of one type of terrain through use of two materials. Unfortunately we see that they look deliniated and deliberate. The colors having stark borders against each other. The tonal contrast draws more attention to the base than it should have, as it is not the focal point of the miniature. This is a big issue with single type flocking on bases, it can detract from the overall look of the finished miniature.
Use of inks and washes can help alleviate this, but in the end there is only so much you can do to reduce this distraction on a miniature when using single or dual basing materials.
Here we have a resin base. Something I did a couple months ago in a 40mm base, to work with some terminator models. Overall it is a pretty darned good base. But you will note that the 'sand' of the base seems odd. Resin bases (scenics) are very nice, and remove a lot of hassles when dealing with loose flocking materials. They have their place in doing your miniatures. But even the best scenic bases start to look manufactured in large numbers. Painting alleviates some of this, but in the end with limited numbers of looks for the bases, they become repetitious.
Repetition in basing can help tie an army together. But in larger numbers it starts looking drab, and detracts from the overall look of an army. The best scenic resin bases in the world can't stop this from happening by themselves. And when you are fielding 30+ models on 5-6 base looks, it becomes quite obvious, unless you do something to spruce them up. In this case static grasses, snow pastes, and other options help to break up the monotony imposed by limited sculpts.
Sticking with just resin bases is fine, but you have to keep in mind the above issues. Even limited changes in painting palette can help to break up the similarity.
This photo helps show how a mixed blending of flocking materials can break up the monotony. As well as help to make the base look more natural. No one tone or type of material dominates, and the use of static grass helps to break up the base further. The base doesn't draw the eye unnaturally away from the model itself, but does set a feeling of disturbed plains. With the gravel, sand, and flock all working together as a blend that helps gap fill (smaller material filling the gaps from the larger gravel) and covering with little to no show through of the base.
Overall, the effect looks nice, with no one tone or material dominating, and nothing looking forces into place. With the smaller materials helping to fill in on the gravel, the gravel no longer looks as if it was tossed down, but more like it has been there for some time. This helps to make the base look more natural, and less deliberately done. Nothing distracts more on a base than having it look like the materials were tossed at the miniatures feet, and not like the miniature came onto the ground naturally.
Comments, suggestions, critiques all welcome!
First lets talk about 'flocking material', the green powdery type, as well as basic sand.
 |
| Here we have an ancient GW Ogre, based with sand and 'flock'. |
Firstly we'll notice the odd look of each material. They stand out and looked deliberately set. They have a single color (which can be changed through the use of paint, inks, or different color material). Care was taken to attempt to make this base look less like a flat ground of one type of terrain through use of two materials. Unfortunately we see that they look deliniated and deliberate. The colors having stark borders against each other. The tonal contrast draws more attention to the base than it should have, as it is not the focal point of the miniature. This is a big issue with single type flocking on bases, it can detract from the overall look of the finished miniature.
Use of inks and washes can help alleviate this, but in the end there is only so much you can do to reduce this distraction on a miniature when using single or dual basing materials.
 |
| Resin cast base, painted, but still needing some sanding on the edges. |
Repetition in basing can help tie an army together. But in larger numbers it starts looking drab, and detracts from the overall look of an army. The best scenic resin bases in the world can't stop this from happening by themselves. And when you are fielding 30+ models on 5-6 base looks, it becomes quite obvious, unless you do something to spruce them up. In this case static grasses, snow pastes, and other options help to break up the monotony imposed by limited sculpts.
Sticking with just resin bases is fine, but you have to keep in mind the above issues. Even limited changes in painting palette can help to break up the similarity.
 |
| One of my 'Counts As Thunderwolf' models, using my mixed blend of flocking material. |
 |
| A closer look. Yes it needs a little touch-up, but that is normal when flocking of any type. |
Comments, suggestions, critiques all welcome!
Thursday, December 9, 2010
Flock, and ways to make it better
Everyone has their own take on basing. Some use nothing but resin bases, which they paint, others use sand, etc. etc. etc. Many start with basic 'flocking material', you know the stuff, green, a slight breeze (or a sneeze) and it gets everywhere, and it never matches any gaming surface (except maybe felt cloth). Others get some hobby sand and use it, painting it, or not.
Well I've gone through a number of stages in the 20ish years I've been into painting miniatures. I started with the evil green dust, expanded into sand, worked up to gravel, then on to resin bases. But recently I've decided that no one option is really right. Each has its place, but no one is better than the other. On the other hand each has its drawbacks.
Now, this is where I am now, at the point of finding that mixed flocking materials are much better than any one material. And static grass makes even single material basing look better.
Something you have to keep in mind when using basing materials, thickness of the glue. Thin glue is great for using as a over coating after you dip a base into the materials and let it dry awhile. But if you don't have a glue that is thick enough to start, that initial dipping will have most of your material falling off in patches when you paint of over coat it. I use Elmer's School Glue, but you have to be a bit selective, because they have changed packaging a bit and you may end up with a bottle of their watered down junk glue.
I started doing a bit of research on flocking the last few months, and came across the not at all new idea of mixing flocking materials. The theory being that mixing the materials gives a more natural look to the base. With different colors, sizes, and textures blending together to help make a base which looks very pleasing to the eye, without being tied to one type of battlefield.
Overall I think this idea makes up for a number of shortfalls in most single or dual material flocking mixes. So I took my green evil dust, the sand/gravel mix, the gravel mix, some very fine sandbox sand, and a mix of sand/rock/gravel from the edge of a driveway (which oddly enough is a TROVE for basing). Gave it all a thorough shake and mix, and came up with this mix.

Overall this mix blends very nicely, and with static grass patches looks like your typical field in the late spring/early summer. With different mixes you could get any time of the year, or any type of terrain. So don't be shy on mixing those materials together to get a more natural look. It does look good and works much better than just one type of material.
Well I've gone through a number of stages in the 20ish years I've been into painting miniatures. I started with the evil green dust, expanded into sand, worked up to gravel, then on to resin bases. But recently I've decided that no one option is really right. Each has its place, but no one is better than the other. On the other hand each has its drawbacks.
 | |
| You know the stuff... flocking material, in a basic green. Evil stuff... gets everywhere. |
 |
| Typical 'gravel' flocking material. Not bad, but lets be honest it looks like big rocks with most 25-28mm figs. |
 |
| A not too bad mixed sand/gravel flocking material. But even this has issues with the 'mini-boulders'. |
Overall I think this idea makes up for a number of shortfalls in most single or dual material flocking mixes. So I took my green evil dust, the sand/gravel mix, the gravel mix, some very fine sandbox sand, and a mix of sand/rock/gravel from the edge of a driveway (which oddly enough is a TROVE for basing). Gave it all a thorough shake and mix, and came up with this mix.

Overall this mix blends very nicely, and with static grass patches looks like your typical field in the late spring/early summer. With different mixes you could get any time of the year, or any type of terrain. So don't be shy on mixing those materials together to get a more natural look. It does look good and works much better than just one type of material.
Salamanders 600ish pts finished
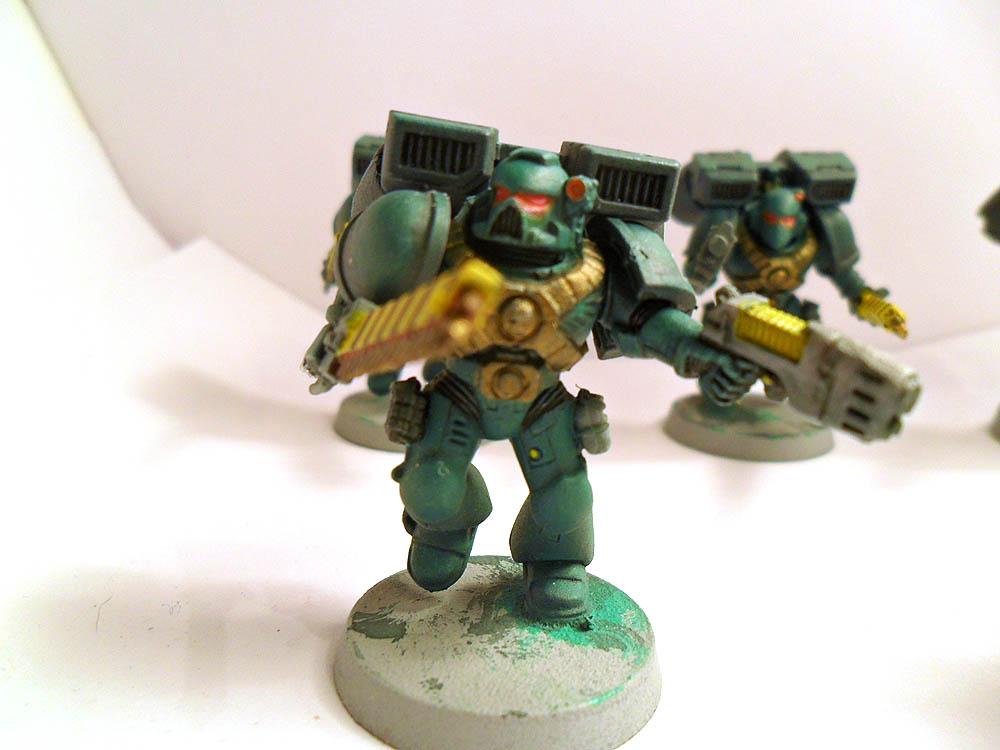
I actually finished the paint several days ago, and sometime today will be flocking their bases and hitting them with a final layer of matte sealer. But I felt it would be nice to get a pic with them all in it, then I took a few more, several including projects at various points of completion.


The rhino may seem 'dusty' in the pics, but that has more to do with how I finished the model as well as lighting conditions and my not being a photographer. Overall I feel the project went well, and I'm torn on whether to sell them or keep them... but I do need to make money at this home business, so eBay will be seeing them soon I think. I have come to the conclusion that I need to get a can of the soon to be released Angels Green from The Army Painter. It will speed up the work by huge amounts, as I have been custom mixing the every single layer at this point. Unfortunately GW are bastards and stopped making the one color I need to make this range of greens... Jade Green. So my ever dwindling supply of the old good GW paints are causing me to like Vallejo and P3 paints more and more.


The rhino may seem 'dusty' in the pics, but that has more to do with how I finished the model as well as lighting conditions and my not being a photographer. Overall I feel the project went well, and I'm torn on whether to sell them or keep them... but I do need to make money at this home business, so eBay will be seeing them soon I think. I have come to the conclusion that I need to get a can of the soon to be released Angels Green from The Army Painter. It will speed up the work by huge amounts, as I have been custom mixing the every single layer at this point. Unfortunately GW are bastards and stopped making the one color I need to make this range of greens... Jade Green. So my ever dwindling supply of the old good GW paints are causing me to like Vallejo and P3 paints more and more.
Wednesday, December 8, 2010
Painting Leather and finished work
Today I want to talk about painting leather. To some this will seem like a basic concept, but to others it may just click that 'oh, yeah' area of the brain and help them with a project.
Painting leather starts with deciding if it will be a polished leather, or a dull more natural or worn leather. Polished leathers tend to be 'shiny' with more obvious highlights than worn/natural leathers. The next step is deciding on the color for the leather. Many choose to go with browns or blacks, but you can actually do any color you wish to fit with your ideas on the work you are doing.
Next you need to decide on how you are going to do the painting. Base>shade>highlight, Shade>mid-tone>highlight, or some other way that works for you. Lately I've been going with shade>mid>highlight, as it allows me to build the highlights more naturally from the shaded darker areas.
Something that should be stressed, thin, your, paints. If you want to blend layers well you need to thin the paints down to the consistency of skim milk, basically water with some pigment coloring it. Dip the brush, brush off excess (leave a wet trail on a napkin/paper towel) then blend towards edges starting in recessed areas. This allows you to build up the color in a more natural and translucent manner. And gives the painted area a much more realistic look.
With polished leathers you may wish to seal up the finished work with a matte sealer, then using a liquid gloss or satin sealer with a brush on the leather areas to bring back the 'shine'. Or you can leave it with a matte sealer (with stark enough highlighting at the extreme edges a matte sealer will not take away from the 'shine').
And as the post title says, some finished work.
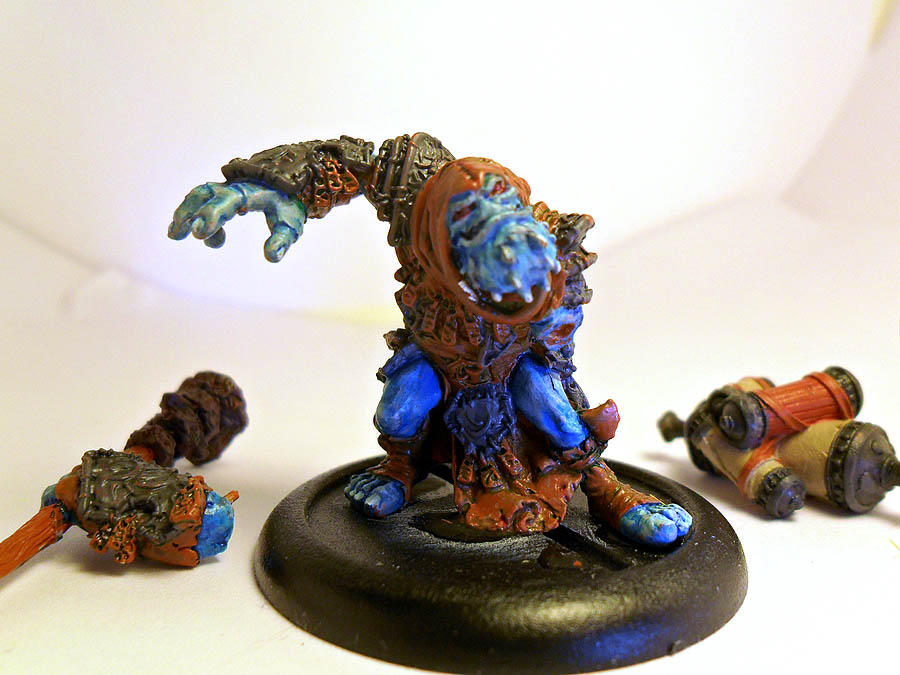
I finished up the Trollblood warlocks I was working on and here they are.


Next post will be the finished work on the Salamanders project, and WIP picks of my Death Talon Cavalry!
Painting leather starts with deciding if it will be a polished leather, or a dull more natural or worn leather. Polished leathers tend to be 'shiny' with more obvious highlights than worn/natural leathers. The next step is deciding on the color for the leather. Many choose to go with browns or blacks, but you can actually do any color you wish to fit with your ideas on the work you are doing.
Next you need to decide on how you are going to do the painting. Base>shade>highlight, Shade>mid-tone>highlight, or some other way that works for you. Lately I've been going with shade>mid>highlight, as it allows me to build the highlights more naturally from the shaded darker areas.
Something that should be stressed, thin, your, paints. If you want to blend layers well you need to thin the paints down to the consistency of skim milk, basically water with some pigment coloring it. Dip the brush, brush off excess (leave a wet trail on a napkin/paper towel) then blend towards edges starting in recessed areas. This allows you to build up the color in a more natural and translucent manner. And gives the painted area a much more realistic look.
With polished leathers you may wish to seal up the finished work with a matte sealer, then using a liquid gloss or satin sealer with a brush on the leather areas to bring back the 'shine'. Or you can leave it with a matte sealer (with stark enough highlighting at the extreme edges a matte sealer will not take away from the 'shine').
And as the post title says, some finished work.
I finished up the Trollblood warlocks I was working on and here they are.


Next post will be the finished work on the Salamanders project, and WIP picks of my Death Talon Cavalry!
Monday, November 29, 2010
Salamanders WIP
I see green people...
Salamanders, my current marine project. Which I have been working on for several days now. They are interesting fluff-wise, as well as in painting and figuring out minor conversions or adjustments to make them more unique than you can typically get with just a Battleforce box. Dipping into my bits box I have pulled out some minor variation parts, arms, weapons, etc. But overall this force isn't getting any major conversions on the troops, other than the next 10 which may get some greenstuff work on the armor to make 5 of them sternguard.
As a bit of a change of pace I've been painting them in reverse of my normal blending style. Starting with a basecoat that is the darkest color and working up to the highlights. With green and a few other colors this works out very well, but can be a bit time consuming when you first start doing it.
Their basecoat color is a mix of GW's Jade Green (old paint) and Blood Red. In a 3 Jade Green to 2 Blood Red ratio, then 1 brush full of water. Over that the 'medium' color of the blending is 3 Jade Green to 1 Blood Red plus 1 brush of water and 1 drop of mixing medium. And the highlight is 3 Jade Green + a small amount of blood red + 1 drop ofmixing medium + 2 brushes of water.
Mixing medium is a very nice addition to my supplies, as it extends to use of paints I mix. As well as giving it more consistent flow as I blend. It can be hard to work with at first, but as you deal with it more often it becomes truly useful for a number of painting techniques from blending to washing to fine detail work.


I still have to put chapter markings and squad markings on these marines, as well as work out the basing, but that won't take too long. Then it is on to the next 10 marines, of which 5 will be added to the first 5 to form a full 10-man tac squad. The last 5 will be given a number of minor conversions and done up as sternguard. I plan to modifying/converting their weapons to get several combi-weapon options.
Until next time!
Salamanders, my current marine project. Which I have been working on for several days now. They are interesting fluff-wise, as well as in painting and figuring out minor conversions or adjustments to make them more unique than you can typically get with just a Battleforce box. Dipping into my bits box I have pulled out some minor variation parts, arms, weapons, etc. But overall this force isn't getting any major conversions on the troops, other than the next 10 which may get some greenstuff work on the armor to make 5 of them sternguard.
As a bit of a change of pace I've been painting them in reverse of my normal blending style. Starting with a basecoat that is the darkest color and working up to the highlights. With green and a few other colors this works out very well, but can be a bit time consuming when you first start doing it.
Their basecoat color is a mix of GW's Jade Green (old paint) and Blood Red. In a 3 Jade Green to 2 Blood Red ratio, then 1 brush full of water. Over that the 'medium' color of the blending is 3 Jade Green to 1 Blood Red plus 1 brush of water and 1 drop of mixing medium. And the highlight is 3 Jade Green + a small amount of blood red + 1 drop ofmixing medium + 2 brushes of water.
Mixing medium is a very nice addition to my supplies, as it extends to use of paints I mix. As well as giving it more consistent flow as I blend. It can be hard to work with at first, but as you deal with it more often it becomes truly useful for a number of painting techniques from blending to washing to fine detail work.

 |
| This marine's right arm is magnetized, and has the option of a plasma pistol or bolt pistol. |
 |
| This is the squad sargeant, his arms are both magnetized, and there are a mix of power weapon, plasma pistols, chain swords, and bolt pistols magnetized for use with him. |
 |
| A small scout unit done in a similar paint scheme as the marines. In this case I used a lot of washes to get cloth effects on them. |


 |
| The first half of the tactical squad I'm doing up. The Sargeant has both arms magnetized to allow for a number of weapon options to be swapped. And the special weapons trooper has his left arm magnetized to allow him the option of flamer, meltagun, or bolter. I plan to magnetize another marine in the next batch of 5 to allow for swapping in a heavy weapon or using a bolter. |

 |
| Sargeant in all his glory. The almost 'glowing' effect on the plasma pistol was not intended, but definitely looks great. |
 |
| Special weapons grunt hard at work tossing a grenade! |
I still have to put chapter markings and squad markings on these marines, as well as work out the basing, but that won't take too long. Then it is on to the next 10 marines, of which 5 will be added to the first 5 to form a full 10-man tac squad. The last 5 will be given a number of minor conversions and done up as sternguard. I plan to modifying/converting their weapons to get several combi-weapon options.
Until next time!
Sunday, November 28, 2010
Post holiday post
Hope everyone had a great Thanksgiving, and if you had the 'good fortune' of Black Friday shopping got what you were trying to get (I know I did).
I'm elbow deep into working on the battleforce box minis. I've tossed out several chapters and settled on Salamanders for this force. Mainly because green sounded more enjoyable to paint than yellow (sorry Imperial Fists, yellow isn't hard, but it is annoying at times). At this point I have the scout squad (painted) and assault squad (painted and magnetized for gear swapping). I've also decided that instead of 15 tac marines, I'll do 10 tac and 5 sternguard or devestators out of what is left in the box. Still deciding on the stern or devs though, so *shrug*. I'll have pics of the current work up either later today or tomorrow.
Next on my 'elbows deep in work' are my epic trollblood warcasters. They've been lamenting their fate at being left roughly half finished for a bit over a week now. And I should actually have them done in a few days. I just needed a break from high detail minis, so I decided to push them back a few days. At this point I need to finish up work on the leather, tartan, and armor and they will be ready for full basing. Not a lot, but it is about 3 layers of blending for each part.
I've also started working on the palette I'll be using for my Crystal Brush entries. I have a limited edition Dragonblood mini as well as a Kabuki minis Executioneress fig that are definites for entries. I'm also looking into at least 1-2 more slightly larger projects for the Crystal Brush.
I'm also roughing out a post on custom color mixing to go along with the next batch of posts on the Salamanders I'm working on. Some may be surprised at what was mixed to get their greens.
Later hobby enthusiasts!
Sunday, November 21, 2010
Saturday, November 20, 2010
Any suggestions
I'm looking into a new lighting rig or bulbs for my current primary light. I'm thinking daylight bulb would be cheapest to go with, rather than a full lighting rig. As I'm finding the bulbs I currently use give a yellow cast when taking pictures, which I then have to adjust levels in photoshop to fix the pictures. I believe the flourescent bulbs I'm currently using are also adding to the blur effect I'm getting when taking pictures. Not really sure, but if that is the case I really do need to 'upgrade' from what I'm using.
I need suggestions on reasonably priced daylight bulbs and/or daylight lamps.
I need suggestions on reasonably priced daylight bulbs and/or daylight lamps.
Friday, November 19, 2010
Updated Progress
I know it has been a while since I last posted, but I do have progress to report, and pics to show!
I've just completed several figs for sale (going up on eBay). As well as a fair amount of work on several others which will be sold. Also I have finished work on a personal fig, and gotten a fair amount of work done on four others I will be keeping. Problems have arisen on one sale project though... they are marines, a battleforce box actually... the trouble is deciding if I will do them as Imperial Fists, or Crimson Fists.
But now onward to show what I've been working on of late.
I finally got things together and finished up Lady Hammerstrike, had a few minor touch-up issues to deal with and the basing. But now she is finished and will be put up on eBay. I really did enjoy painting this fig, such a great change from power armor, power armor, power armor.

My next figs to complete (no, don't count the 'nearly' finished Knight of Bal-Timorea yet) was Kaelyssa, Night's Whisper from the Warmachine line (Retribution warcaster). She was an interesting change from the Space Marines I've been buried in for a while. Having a number of 'tricky' areas to paint, namely the 'arcane' lines of force from her warcaster armor power nodes. I learned a few new tricks while painting her which helped on the following figs.


Then I got down to work on a Retribution warjack, a Gorgon light warjack. Needless to say, Retribution are a pain to paint at times, but I found doing white to be pretty easy overall. Shade through highlight was actually quite easy to do, I'm not really sure why some people have trouble with white and yellow. Unfortunately, the white of the 'jack armor blended into my lightbox... so the pics kind of suck for this fig. I will be using a different backdrop to take pics on for retribution warjacks in the future.


I then worked on a Mage Hunter Assassin. Another fun fig, this was the variant sculpt. I find that I LOVE Privateer Press figs, they have minimal flash, very very minimal issue with mold lines, and are overall two to three steps above the quality of Games Workshop in pretty much every way with their metals.
The Mage Hunter was one in which I decided to use a variant color scheme, going with a type of self created light OD Green for the leather, and white for the armor. The standard scheme uses grey leathers and armor, among other things.


After getting those done, I got to work on some Hordes Trollbloods. An interesting line, trolls with a semi-scottish leaning. All the figs in this line are very characterful, and quite interesting overall.
First up is Madrak Ironhide, World Ender, (An Epic warlock). He's a very dynamic fig, with lots of detail. I figure I'm roughly 50% finished with him and the other Epic trollblood warlock I'm working on. I decided to go with greens in the shading on this, which is giving an interesting effect on the brown leathers.

I'm also working on Hoarluk Doomshaper, Rage of Dhunia. This character fig is very interesting due to the major amounts of detail that are present, as well as the dynamic pose and obvious rage in the face of the fig. I am using the same green mix to shade this character, which gives it a similar feel to Madrak's fig which I am doing. I'm sharing the palette between figs, so I don't waste paint, and this gives a 100% unified look to them as they are using exactly the same paints.

I'm having a few issues with blurring with this lighting setup, which is very obvious in the face of the next fig. A Warmachine/Hordes mercenary Nyss Sorceress. Overall I went with a color scheme which is almost counter to what is typical for this fig. Using blues for all the leather, browns, oranges, and greens for her outer cloak as if each bit is a leaf and it is blurring the seasons.


This last fig is a personal project fig, as I find I don't want to sell it. It's a nice fig, and will fit into my new Warmachine army, as well as looking very nice and acting as a bit of a display piece to show off my skills (it REALLY does look better in person... I have to figure out this dang camera a bit more).
Back to work I go (painting that is)! Later readers!
I've just completed several figs for sale (going up on eBay). As well as a fair amount of work on several others which will be sold. Also I have finished work on a personal fig, and gotten a fair amount of work done on four others I will be keeping. Problems have arisen on one sale project though... they are marines, a battleforce box actually... the trouble is deciding if I will do them as Imperial Fists, or Crimson Fists.
But now onward to show what I've been working on of late.
I finally got things together and finished up Lady Hammerstrike, had a few minor touch-up issues to deal with and the basing. But now she is finished and will be put up on eBay. I really did enjoy painting this fig, such a great change from power armor, power armor, power armor.

My next figs to complete (no, don't count the 'nearly' finished Knight of Bal-Timorea yet) was Kaelyssa, Night's Whisper from the Warmachine line (Retribution warcaster). She was an interesting change from the Space Marines I've been buried in for a while. Having a number of 'tricky' areas to paint, namely the 'arcane' lines of force from her warcaster armor power nodes. I learned a few new tricks while painting her which helped on the following figs.


Then I got down to work on a Retribution warjack, a Gorgon light warjack. Needless to say, Retribution are a pain to paint at times, but I found doing white to be pretty easy overall. Shade through highlight was actually quite easy to do, I'm not really sure why some people have trouble with white and yellow. Unfortunately, the white of the 'jack armor blended into my lightbox... so the pics kind of suck for this fig. I will be using a different backdrop to take pics on for retribution warjacks in the future.


I then worked on a Mage Hunter Assassin. Another fun fig, this was the variant sculpt. I find that I LOVE Privateer Press figs, they have minimal flash, very very minimal issue with mold lines, and are overall two to three steps above the quality of Games Workshop in pretty much every way with their metals.
The Mage Hunter was one in which I decided to use a variant color scheme, going with a type of self created light OD Green for the leather, and white for the armor. The standard scheme uses grey leathers and armor, among other things.


After getting those done, I got to work on some Hordes Trollbloods. An interesting line, trolls with a semi-scottish leaning. All the figs in this line are very characterful, and quite interesting overall.
First up is Madrak Ironhide, World Ender, (An Epic warlock). He's a very dynamic fig, with lots of detail. I figure I'm roughly 50% finished with him and the other Epic trollblood warlock I'm working on. I decided to go with greens in the shading on this, which is giving an interesting effect on the brown leathers.

I'm also working on Hoarluk Doomshaper, Rage of Dhunia. This character fig is very interesting due to the major amounts of detail that are present, as well as the dynamic pose and obvious rage in the face of the fig. I am using the same green mix to shade this character, which gives it a similar feel to Madrak's fig which I am doing. I'm sharing the palette between figs, so I don't waste paint, and this gives a 100% unified look to them as they are using exactly the same paints.
I'm having a few issues with blurring with this lighting setup, which is very obvious in the face of the next fig. A Warmachine/Hordes mercenary Nyss Sorceress. Overall I went with a color scheme which is almost counter to what is typical for this fig. Using blues for all the leather, browns, oranges, and greens for her outer cloak as if each bit is a leaf and it is blurring the seasons.


This last fig is a personal project fig, as I find I don't want to sell it. It's a nice fig, and will fit into my new Warmachine army, as well as looking very nice and acting as a bit of a display piece to show off my skills (it REALLY does look better in person... I have to figure out this dang camera a bit more).
Back to work I go (painting that is)! Later readers!
Tuesday, November 2, 2010
Prioritizing
Sometimes a load of projects come along, happens to everyone at one point or another. So how do you deal with it? I know that over the years I've come to find that I need to make a list, and set an order of priority to the projects. Prioritizing helps minimize snags in projects, as well as get the things done in a reasonable order and timescale. This post is about my method of prioritization, so it will have examples that others may not have to deal with, bear with me.
Over the years I've worked out a system that works reasonably well, with minimal conflicts. It is a listing system with three 'tiers'.
Personal Projects (low-medium priority).
Commission Projects (medium-high priority).
Outside Work (high priority, as it includes family, school, and non-miniatures things that MUST be done).
As an example my current priority list looks like this.
Outside Work:
1) University work (I'm working on my bachelors in Business Admin): 2 hours per day
2) Remodelling work with father (He flips and rents houses): 2-4 hours weeknights
3) Family time (several hours a day) 1-2 hours weeknights
Commission Projects:
1) Hordes & Warmachine minis painted/based (5): 2 hours per day (approx 20 hours to finish
2) Blood Angels force (500 pts approx): 2 hours per day (approx 20 hours to finish)
3) Malifaux mini (basing): approx 2 hours to finish
Personal Projects:
1) Knight of Bal Timorea (basing): approx 2 hours to finish
2) Repurpose marines to new Star Drake chapter (roughly 50 marines, 1 LR): as time allows
3) Deathwatch Killteam (10 marines, possibly 1 rhino): reworking painting style to be used on them, approx 12 hours to finish. On hold until commission work finished.
Now this might seem like a lot of things going on for some people, but this is kind of typical for me and actually a light to moderate load of projects. If I stick to my priority list, I will get them all finished in about 2 weeks. And by then I'll have a half dozen to a dozen more projects to prioritize. Needless to say my Outside Work section doesn't change too much, an addition here or there, but overall it's pretty well set in stone. Commission work includes things I'm working on to put on eBay, as I am doing this as a home business as well as for the enjoyment of the hobby. And Personal Projects is by far the most flexible, as I work those around everything else.
Knowing how to set up these lists helps a great deal, as I can look at the list and know what I should be working on first. Such an example is looking at the list and saying 'I'll put in 2 hours on the Blood Angels force by priming and cleaning up the figs and bits' and also saying 'while the paint dries I'll organize the Star Drakes so that I get them done a section at a time'. Maximizing time spent is very useful, as some work is time long, but effort light, or short time and needs a lot of effort. Priming figs being the former, doing highlighting being the later.
Many people I've known over the years get into a ton of projects, then can't seem to ever finish them. And a lot of that comes from not being able to prioritize and make the best use of their time. They get going on one thing, then another, and another, without actually finishing any of them. It's a shame really, since many of those projects are pretty cool, but the person just couldn't figure out a way to 'schedule' their time to work on things in a reasonable fashion.
Hopefully this article will help some people, by showing a way to prioritize their work. But it would be nice to get comments on ways the readers use to make the best use of their time.
Monday, November 1, 2010
Inventory expansion
This last week was rather annoying and good at the same time. I've expanded my miniature inventory to work on by quite a bit, with more on the way. A number of Hordes and Warmachine minis just arrived. A Space Marine battleforce and razorback are getting ready to be worked on (with a large number of minor conversions), a Space Hulk game is begging me to open it and get to work on the minis inside. A Bretonian Pegasus Rider will be arriving soon, as will a mini from Dragonblood miniatures and one of the 21st century pin-up figs from Kabuki Miniatures (www.kabukimodels.com). Also I've picked up a few cans of The Army Painter color primer (Rat Fur, and Pure Red), and I may order up a couple more just to expand options. And I'll be dealing with static grass, which is a new concept for me, the results should be interesting.
Progress on my Knight of Bal Timorea has been at a standstill while I dealt with family and school issues, but will resume this week. I need to work on the base and it will be finished, so at this point I'm working on ideas for how to finish it. At this point I'm thinking simple may be better, but I don't want it to be just a plain dirt/grass basing.
My Star Drakes are also getting some more work this week as I finalize poses for the riders. At this point I plan to have (of the 5 in the works atm) 2 riding, 1 mounting, and 2 standing alongside their mounts (fighting alongside). I've mounted the cold ones on 60mm bases, which allows me to really go to town on their bases, which will be a mix of slate/shale rock outcroppings and ground foliage/jungle vines. I may add some skeleton bits, and other fun items, but that is still being debated.
I've had to bin 13 2 of my molds due to an issue with air bubbles, so new molds are being worked on this week as well. I'm finding that my Star Drake shoulderpad has issues with air bubbles in the raised details, so I've changed its placement in the mold form to help account for that, and hopefully reduce issues. I don't plan to use the shoulderpad for ALL of the Star Drakes, but definitely for 'noteable' figs, such as HQ's and Scale Guard (Wolf Guard).
My Deathwatch killteam is on hold, I have one fig 85% finished, but he's going into the Simple Green for a fresh restart. I've had some ideas on how to do the silver on the left arm and shoulderpad that will make it interesting to do.
I've also started to 'remodel' my workspace, I'm removing a computer from one desk, and turning that desk into my workspace. I've bought a number of storage containers (multi-bin ones) to help sort out bits in a more efficient way (triple the storage = much less headaches). I'm also looking into a larger sortable container for my paints, as I've simply outgrown the one I have by nearly double its capacity.
My lightbox is now in the 'gotta get the time to do it' stage, as my initial lightbox had a number of issues due to size. I'm looking into getting 2 more lights for use with it as well, though I'm not so sure daylight bulbs are really necessary (not to mention they are freaking expensive). Any suggestions on light bulbs and simple/cheap light fixtures for use with a lightbox would be appreciated.
And today we bring you...

Monday, October 25, 2010
A week at a glance
This last week took up all of my painting and sculpting time, as it was finals week for university classes I'm taking. I did get a little work done, but overall nothing worth taking pics of. Ran into some issues with my shoulder pad molds, and I'll have to make new molds. My RTV is having 'issues', but I know how to fix the problem with air pockets. Soon I'll be placing an order for some 30 minute or 1 hour cure time resin, still researching to see which will work out best for me.
Unfortunately, due to my class schedule for the next 8 weeks, I won't be playing in any tournaments. But I will be taking at least one night a week to get to the FLGS and get a few battles in. Finalizing my killzone team, and looking into getting a mini-league going for it at the LGS.
Since I don't have pics of any new work, I bring you...

Subscribe to:
Comments (Atom)