Wednesday, February 15, 2012

Red red red red... and black... and white... and flesh tones!

I've gotten all the armor and tabards finished on the Sisters, and the flesh and eyes and lips. Of course, my best tiny tiny spotter decided to curl on me tonight... after a year of sporadic use... I shall lament its curling..... right up until I get a hobby knife and cut the curl off! Mwuahahaha!

At this point I'm debating how what way to go with the symbols. I know they will be grey, but I have to figure out which greys. Should be finishing up the symbols tonight after class, which reminds me I have a chapter to read this afternoon (silly instructor is giving us a 'quiz' on the chapter, for her first class, go figure). But at this point I can honestly say (if I don't count the rhinos, immolators, and exorcists) that I'm roughly 75-80% finished with them.

Now that is a lot of Sisters...


Three different skin tones, though the picture really makes the 'african' based one look all wrong


The Mistress for the Repentia unit. Details on the strangeness below.

WIP on a Sister Dialogis. I hate the GW fig for the Dialogis, so yon Seraphim shall become one
When I purchased my SoB infantry I used the great and powerful eBay. Of course when you use that tool, sometimes you get some 'odd' figs. In my case a seriously chopped up normally bolter toting grenade pin pulling sister. Plus the Seraphim Superior missing her power sword. I looked at them and thought 'Mistress for the repentia, and that one will work great for a dialogis... after I do a little work.'

Digging into my insane clutter and bits collection, I pulled out a pair of Dark Eldar agonizer bits, and got to work getting them to work as neural whips. I little snipping, a bit of glue, and presto we get an interesting looking Mistress.

With the Dialogis I pulled out the pin vice and got to work, added a bit of brass rod, and decided to hold off on finishing the fig for a bit. I'll be creating some kind of speaker or microphone for the hand held rod, the foot based one will be used to fix her to a custom base.

Until later!

Sunday, February 12, 2012

Monochrome Sisters of Battle WIP

As my last post covered, I've decided to go monochromatic with my Sisters of Battle using red. Overall this color scheme is coming out very striking, and different than many SoB armies I've seen over the years. At first I worried that it would all end up blending together, but the contrasts have helped keep it from happening.

I got more work done today on them, and here are some more WIP pics.


I've decided to continue with this scheme throughout the army, and I've also decided that the symbols, buttons, and other things will be in greys. And that I'll be doing several of the sisters as non-caucasion (though I haven't decided on any one racial type). It's obvious from the pics that I'm getting pretty damn good at skin... have to admit I enjoy painting female figs, and I've been practicing a lot on skin. I'll be using this army to practice a few skin types I haven't really worked on much, namely asian and African based skin tones.

All the 'leather' for the figs in this army will be black, with grey highlights (very very very dark grey). I'm still debating putting in some metallics, possibly brass. OSL for plasma pistols and the vent coils on plasma pistols I believe will be in a green. I find that green for plasma coils and the OSL for them works very well.

Power weapons, like the cannoness has in her pic, are definitely a work in progress. I haven't settled on exactly how I'll do them, but I only have a few in the whole army (that happens when you buy lots off eBay to build an army). I think I may go with a marbling effect, as I do have natural sea sponges to work with, but I'm not 100% set on that. My typical way of doing things is to paint up from a shade to a highlight, then line in 'lightning', then wash the weapon a few times not always with one wash color or ink but usually 2-4 different ones and stick to the 'formula' throughout an army.

Until later!

Saturday, February 11, 2012

Sisters of Battle WIP, Deathwatch HQ WIP, and random painting

(Note: My camera is ticking me off, I take no pride in the quality of the pics here... gotta figure out how I borked the camera, now onto the post)

Taking a break from the buildings. So here I am looking at my semi-worked on Sisters of Battle and decided to get back to work on them. At the start of yesterday they were all black primed, and some had blue tabards. But today after about 10 hours of work on nearly 30 of the sisters I decided to go with a somewhat odd for me choice, monochromatic.

All the blue tabards will be gone, but possibly one may stay on the Cannoness (haven't decided). And they will all be monochromatic using red. I'd already decided to do the armor as chaos black>2x Baal Red washings>Gore Red highlight>Baal Red wash>Blood Red edge highlight>Baal Red wash. This gives the armor a somewhat similar affect as the White Dwarf article on how they painted up the War Sphinx a few issues back (maybe 4-6 issues, can't remember).

Now I've decided that the monochrome effect will be used, so I'm using gore red on all the tabards, edge highlights and spatial highlighting with watered down blood red, then a baal red wash, then a gryphone sepia wash. The sepia wash really helps to bring the color back to a more muted 'cloth' like color.

Here are some work in progress pics (I'm not even half done with all the Sisters infantry figs yet...):


I also took the time this week to put together the first fig for the Deathwatch charity project, a Blood Angels Watch Commander.


and on top of that got to work on a fig from Mad Puppet Miniatures, Bellatrix. Overall I don't like how it's turning out, and I'll probably give it a soak in Purple Power and start over. But it won't hurt to get some comments on the current state of the fig.


As you can see in all the pics, I have a TON of figs on it, vehicles, hobby stuff... basically my work space is a horrible mess of 'I'll get to this project next'. Hate how that happened. But as I get the Sisters done I'll get more organized, it's been kind of a hurdle for me for the last 2 months.

Until later!

Thursday, February 9, 2012

Oriental Village Building Basing, WIP

The basing of the buildings is coming along well. With the only real hurdle being the time it takes for the glue to dry, as well as shaping hills and such. But during the 'downtime' I decided to start work on some walls as well. Pink insulation foam I had from a previous project was cut up and used to form the hill. I filled the gaps with wood putty.

I realized that the hill wasn't quite the size I needed a bit late, but fixed that with some 'stones' as well as the addition of a patio/porch made with various scale wood I have. Overall this project is turning out even better than I had thought it would initially.


More WIP posts and pics should be up during the next few days.

Until later!

Sunday, February 5, 2012

Village work continues, WIP pics

A few days have passed since my last post, and today I got a lot of work done on the current oriental village buildings. Detail work finished, and painting finished.

At this point I'm thinking of how to base each of the buildings, and I keep thinking of putting the 'tea house' on a small hill.

Overall this has been fun work, and when it came time to paint them I decided to keep to a very small palette.

Primer: Krylon Black Primer, The Army Painter Rat Fur Primer
Base Coat: FolkArt Burnt Umber
Mid-tone: FolkArt Bark Brown
Highlight: FolkArt Linen


Keeping to such a small palette of colors kept the buildings all tied together in their look. Do they look rough? yes, intentionally. These are for play, not for extreme detail and precision. Plus, it has been years since I'd built and painted buildings, so I'm fairly rusty on techniques and had to relearn them on the fly. I like how they turned out, detailed enough to look good from arms length (wargaming range of looking in general).

This project isn't finished, but I will probably scale it back a bit. I'll probably do a couple more houses and some scenery like walls, well, etc. I have to get back to work on other projects, so I'll have a lot less time to work on this project for home use. Though this did actually help me realize there are a few projects of this type I will be doing soon enough.

Until later!

Monday, January 30, 2012

A pause from building buildings, some blog links, and a request for hobbyists.

Lately I've been working on more design ideas for the oriental village build, but something occurred to me yesterday... a project I want to do that I have neglected for a few months. But before I get into that I've found a few blogs that I find have good content, tips, tutorials, wip, or other things that make them well worth reading and following.

Legion 9 Studios. Recent posts on a Wolf Lord caught my eye. Love how it came out, the lightning claws not being in a power field and showing the blood of enemies. A very cool take on the fig. (Plus I just won a Blood Angels Omnibus from Danz0 who runs the blog).

http://legion9studios.blogspot.com/

Sproket's Small World. The WIP on a Dark Eldar scourge diorama, have to say it is inspiring to see the work going into it. The use of bits from so many places, some of which I wouldn't have thought of.

http://sproketsmallworld.blogspot.com/

Daughters of the Emperor. Every project I see her post is an inspiration. Her skills with a brush, and her imagination just awe me. Her current project has me thinking of ways to do my AdeptiCon projects in new ways.

http://daughteroftheemperor.blogspot.com/

DuEnDe MiNiATurEs. For a newer blog, DuEnDe is very passionate in his work. While it might not be Golden Daemon level, it is very good overall. His use of color theming make the figs he's posted up bind together very well.

http://malditoduendeminiatures.blogspot.com/

Now, onto the project I've been slacking on.

I am planning on a charity project for later this year, at this point I'm contacting people to see if they may wish to help, as well as soliciting help from those who read my blog. This project will be a Deathwatch army, that when finished will be auctioned off to gain money for St. Jude's Children's Charities. I don't plan to begin the auction until at least August, so plenty of time. But I would like to get interest going now, and start gathering pledges of support and help now so there is time to get this done right.

Anyone that is willing to help, donate supplies/models, or support this, please reply to this post, or e-mail me with the e-mail in my profile (top right of the blog). I know it is early in the year, but this is a project that I don't want rushed. If you know anyone that could help, give support, or donate supplies please pass on the word to me so I can contact them.

Thank you!

Friday, January 27, 2012

Village buildings, more progress!

Had a bit of a hobby stall for a few days as I worked on some school and family things, but came back with more progress. I've primed 2 of the buildings, and have the third ready for priming. I'm still working on some issues with detailing, but overall the progress is satisfactory and back on 'schedule'.

Before I show the progress on the buildings, a picture of one of the things that held me up for a few days...


Helping out my partner with her puzzle. Talk about a real pain in the butt project, took nearly a week to finish. So many odd shaped pieces, and pieces that 'just' fit in the wrong places.... But we persevered! And it came out great, she plans to get it glued together and framed, which I think is pretty cool.

And on to the hobby stuff!

As I said before I'm not sticking to one specific countries way of building, so I've mixed together several oriental building styles. The third building got a roof seen more in old Chinese buildings, which turned out pretty nice overall (at least I think it did). And that building as well as the other small building will be getting more exterior detail work before I get to final painting.

Overview of the buildings so far.

The roof on this one is being a pain, but should turn out well as a thatched roof.


The flash shows the exterior plank detail fairly well, should come out great once painted.

The third buildings roof... a side view perspective.

The second buildings roof, I'll be adding a few things to it before final paint, but it is roughly 75% finished at this point.

The third building from the 'front', very bare at this point, but I'll be adding some exterior detail soon.
Lesson learned today: Curved roofs are a PAIN to do. But in the end they look pretty good.

Second lesson learned today: Measurements are not necessarily right, even when they are right. Seriously, measure twice cut once didn't work at all today, was more like measure twice, cut twice.

Hobby Material Hero of the project.... fruit snack box card (or cereal box card). Tons of uses, and it comes with something you are going to use up anyway, so give it a new life in a hobby project!

At this point, knowing that I still need to do exterior detail and paint, I've started working on how I'll be basing the buildings. In at least once case (the tea house) I think I'll build up a small hill with it on top and steps leading to the door. But for the others, not sure at this point.

I'm looking for ideas and suggestions for creating 28mm scale bamboo plants, the big ones like in some ninja movies. I'm kind of at a loss at this point on doing it and could REALLY use some suggestions.

Until later!

Sunday, January 22, 2012

The oriental village gets a little closer to done (WIP)

Welcome back to the progress on the oriental themed village. I've been a bit lax this week in my progress, but there 'has' been progress. Took a few days off to look over new sources for ideas, and to decide on how to deal with a detailing issue on the buildings. And it has paid off. I've decided to mix between Chinese and Japanese style roofs on the buildings, all oriental after all. I've also decided that it is easier, and probably better, to clad the exteriors in card which I then use various tools to imprint the look of boards. I'll also be using some bass wood, balsa, and other wood to do some details, but the boards of the exterior of the buildings would have just taken ages to do if I did actual boards.

I'm working on exactly how to paint up the first few buildings, and still working on the second and third roof while I rattle the thinking around in my head.

Without further ado... the WIP pics!

Used an idea from a thread I saw on a forum (I'll dig out the link soon and post it up) for how to make 'thatch' type roofs. It's really not that hard, and I'll put a post up in a day or so with the very very easy to use details.

Sculpting tools work wonders on 'engraving' wood panel/board details on card.
I'll be posting more on this project in the coming few days, as I get some more finished (around my working on 2 projects for a university class).

Feel free to comment, critique, give suggestions, etc. I'm always happy to see responses to my work.

Until later!

Monday, January 16, 2012

More thoughts on the oriental themed village

Having watched The Last Samurai again, as well as the anime Samurai Girls, I realized that my smithy isn't really right. So that building will become something else in the village. The weekend was a bust for work, due to an unexpected overnight stay by my kids friends, as well as having to read 8 chapters for my university class. I plan to get back to work on the village tomorrow, just a bit more studying than I like to get done today.

Here are a few screen captures of The Last Samurai that I will be using as more source material for my work.


The last one definitely shows a mistake on my part for the smithy, but overall I believe I'm getting things relatively right. And since I'm not going for perfect reproduction I'm definitely doing well. More updates in the next few days!

Until later!

Friday, January 13, 2012

Oriental Themed Village WIP

It's been a few days, and there have been a few delays, but I now have the first 3 buildings well under way. Keep in mind, I am not going for any specific countries feudal/medieval era buildings, but buildings falling into the 'oriental' theme using aspects of a number of feudal oriental designs. So far things have gone well, and the tea house, smithy, and a farm home are in the rough stage before I get in and detail them out. I have yet to decide if each of them will be able to be opened for interior use, but at this point the exteriors are starting to look good.

I plan to use some of the 400 'scale model wood planks' I bought a couple months ago to do exterior and interior work (for those that are finished in a way to allow interior play useage). Bass wood supports on the corners of the buildings are definitely happening on the ones I have built so far, and possibly all the rest to keep a standard of design between them. The windows have yet to be blocked out and worked on, they are a step past where I am currently which is roof construction.

Here are pics of the WIP:

The three buildings minus roofing

interior shot of tea house

interior shot of farm house

Smithy

I plan to add another foam board layer to each of the acloves and then carve them out on the interior... if this building is finished to allow interior use.

Early stage of the first roof.

I used cardboard, with one facing pulled off and cleaned up. I then cut the angles, then glued them together with paper at the joins. I then glued in a bevel cut piece of foam board as the top of this stage of the roof.

How the roof (currently) looks on the smithy.

How the roof looks on the tea house.
Next phase after I finish up the first stage of the roofs is to then move on to peaking the roofs, then getting the windows boxed in with balsa, tooth picks, and pieces of popsicle sticks as the material of choice. Then 'paneling' the exterior with my scale wood planks along the bottoms of the tea house and farm house walls. I may also build a small 'patio' on the front of the farm house.

I'll be posting more WIP on this in the next few days.

Until later!

Wednesday, January 11, 2012

Minor delay on Oriental Village build

Tuesday should have seen me get a good start on the village pieces. Unfortunately my oldest boy decided to spring the 'I have a project due tomorrow at school, help me' card... needless to say I ended up working on that with him for most of the day so no progress. Today is my first class of the semester for my university program, so no progress today.

Good news is that I will be working tomorrow on it, and will have WIP pics. And I will have another set of rough design plans to post up too for the first two buildings (farmers home, and village smith). I'll also discuss ways to do rice paddy type fields tomorrow, there are a couple ways to do it, but I think I'll go with the easy one for this project.

Until later!

Monday, January 9, 2012

Oriental Themed Village Design Sketch/Plans/Ideas

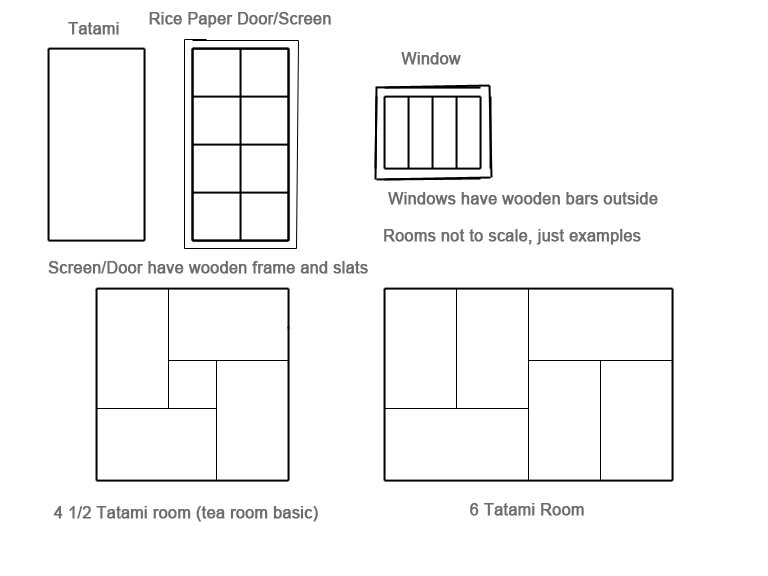
Well, I couldn't clean up the scan enough to get anything worth posting from it, so I opened up Photoshop and doodled out part of my current design sketches and notations. Things to keep in mind when doing Oriental themed buildings and terrain is the overall use of wood, natural fibers (rice paper, rice/grain thatching, rope), and use of space based on a set measurement scale.

Japanese buildings are based on a 'scale' around Tatami mats, which have 3 different standard measurements based on region of Japan. In the case of my buildings I will be abstracting that and going with 1" = 1 meter. Tatami mats are exactly twice as long as they are wide, so in my case the mats are 1" x 2" (1m x 2m) for measurement purposes.

Here is one of the sketches I've worked up to show some of the basics, more will be posted through the week as I get working on the buildings.

The rooms in the image are very very rough, and the mats are not to scale, just to show auspicious placement of the mats. Auspicious placement means that the junctions of mat edges will always form a 'T', and never a cross or '+'. Auspicious placements are thought to bring good luck, while inauspicious placements bring about bad luck.

Feudal Japanese homes and buildings tended towards heavy wooden doors to exterior areas, unless the home had a walled garden/courtyard, in which case rice paper doors opened to those areas. A typical home would have a front and possibly a back door, and several barred windows. While a home for a local lord or samurai may have a walled garden/courtyard, and have a wooden front door, but rear doors made of rice paper partition doors opening on a patio the length of the building which overlooked the walled in area and outbuildings.

Okay, so here are my starting notes. Comments and critiques are always welcome. I plan to get working on the first floor design and initial wall construction on the first building tonight. If all goes well I'll have pics of that work tomorrow, as well as a further design idea image.

Until later!

Saturday, January 7, 2012

Oriental Themed Village Scenery (Updated)

I'm putting together plans for constructing an oriental village. This will be constructed from foam core, bass wood, balsa wood, onion paper, cut up bath towels (we got new ones), and other useful materials I have on hand. Over the course of this weekend I'll be scanning a few of the plans I have come up with, and post on the preliminary work (which begins Monday) on the construction.

Of course, I have no oriental miniatures or games, but I've always had a love of the architecture of Japan and China. So this will blend elements of both and some other influences I've come across. At this point I am planning on 8 buildings (maybe more), several terrain pieces (ponds, walls, bridges, fields/rice paddies). Though I'm not really sure what I'll do with it once finish, I'm leaning towards selling it, or auctioning it off for a worthy cause.

My only trouble with this project is a distinct lack of scale bamboo trees/shoots/whatever for making bamboo groves. If anyone has suggestions I'm very much looking for ideas on how to go about making them for this project.

(UPDATE) I've got the plans roughly 50-75% finished, and will be scanning my rough designs this evening to post. I'm still looking for suggestions for modelling bamboo plants, anyone with ideas feel free to let me know.

Feel free to comment, I'd love to get input on this project. Until later!

Monday, January 2, 2012

New Years Resolutions and Wargaming

Happy New Year everyone, hopefully you had a great holiday season. Over the course of the last few weeks I've had a lot of interesting things going on with family, and thought about some things in general as well as related to gaming (wargaming, roleplaying, computer gaming... etc). This lead me to thinking about New Years Resolutions and how they can be part of Wargaming.

New Years Resolutions obviously are about changing things in a positive way. Be it a resolution to stop smoking, change diet, work out and loose weight, or other things. But has it occurred to you that resolutions can also be hobby related?

My list of resolutions isn't very big, but it does hit upon a few key points for me. Namely getting back in shape, work related changes, and school related changes. But also the parts for work apply to my love of gaming as well as painting, converting, and modelling things for gaming. I started Painting Sanctuary as my home business, and due to a number of things I've kind of let it just bumble along. Well that has to stop, and as my first step towards that I'm going to share my New Years Resolution list with you all.

Elbrun's New Years Resolutions:
1) Get back into shape through changes in diet and excersize. Lets be honest here, if you aren't in at least average shape you get tired, edgy, don't have the push to get things done you need to do. So getting healthier is a must.
2) Put as much effort into my university work as I should be. At least 2 hours a day of study/work. No point in going to school for a degree if you aren't putting in the effort you should be. And lets be honest, more education is a good things for anyone.
3) Putting at least 6 hours a day into Painting Sanctuary work (Mon-Fri). Be it sketching, practicing painting techniques, working on figs/models/terrain. Lately I've been slacking, badly, and 6 hours a week was a high point this last month. That changes today, and can only be a positive thing.
4) Keep my work area less 'bomb exploded' in appearance. I have shelves, cabinets, storage boxes... time to use them properly. Having your supplies and projects properly stored is key to being able to get to them and work on them efficiently.
5) Get at least 2 armies and/or 6 unit/single figs (single figs to tournament standard) finished every 3 months. This is a business, as well as an outlet to help others with their hobbying. If I can't keep up a minimum of work, then I won't succeed. Currently I have one army nearly finished, another about 40% done, and another in the early stages of color scheme design.
6) Blog more regularly, long gaps in blogging don't help anyone. Yep, that sums that up.
7) Get the the FLGS more often to play. The last 6 months have had me at the FLGS about 6 times, and only 3 of them to play. This doesn't really help my ability to play, nor help me be tied to the gaming community locally. This is one I have to change.

Has anyone else come up with hobby/gaming related resolutions this year? I'd love to hear them! Feel free to comment.

Until later!